Sunday, February 14, 2016

Spring 2016 Release

Hi friends! Sorry for my absence the past few days; I was out of town. But I'm back now! When I came home and checked the AG page, imagine my surprise when I saw the new items on the AG website. I was kind of shocked at the small size-- most AG releases are massive or just one item, I don't recall seeing one of this size in a long time.

I thought I would show you a few of my favorite items from the release! I was disappointed there were no BeForever items, but we can cross our fingers there will be soon.


The Spring Breeze Outfit was my favorite of the new releases. I'm not a fan of the mesh overlay (left), but without it (right) I actually really like it! It's a bit bare, but you could always make a necklace for your doll to add some color to the look.


Check out the new Ice Cream Cart! AG food is probably one of the cutest things round. Did you see that cute towel on the side? I really like the popsicles!

I liked the new release quite a bit! What were your favorite items? If you didn't check out the AG site yet, be sure to see what's new! (They still have a pretty good clearance going on, too! I'm about to cave on Rebecca's Makeup-- I doubt it is going lower.)


Tuesday, February 9, 2016

Photo Shoot: Addy in Kirsten's Work Dress

I did a photo shoot with Addy today! I was looking for a really good picture of her to make a "Meet My Dolls" page, and couldn't find one I loved of Addy. In these pictures, Addy is wearing Kirsten's Work Dress. AG retired Kirsten's Work Dress ages ago, but I was lucky enough to get it in a trade with an AGPT member.


Aren't her eyes pretty? There's such a deep chocolate color.


This was my favorite! I don't know exactly what it is... but it captures Addy's caring personality.


The brown stuff behind her is actually some netting for our deck. I played with the settings on my camera to blur it out so all of the focus was on Addy!


Kirsten's Work Dress is one of my all-time favorite AG outfits. Look at how long Addy's hair is! I did two braid connected in the back to pull it out of her face.


I really like this close-up. I was able to catch the "good" parts of the snow-- it has been raining a lot here so the snow has become more of a slush.

Have you taken any pictures recently? I love using the camera! I'm lucky enough to have a DSLR, but I didn't until a year or two ago... Having a DSLR makes it easier to get good pictures, but you can definitely get decent ones with a point and shoot.

Keep your eyes peeled on my IG for a few others I didn't post. ;)


Monday, February 8, 2016

American Girl Books: Lea Leads the Way


I have been sick with a fever, but luckily I went ot the library yesterday so I had a good book to read. My library didn't have the first book, but they had the second Lea book, Lea Leads the Way. I know some people buy the doll without reading the book, but I have to read the books first.

Lea and her older brother, Zac, visit his host family in Brazil. At first, Lea feels like an outsider because she is the only one that lacks the knowledge of the rainforest. She is frustrated she can't find any animals. She and Zac go on a hike and find an injured baby sloth on the way. But what do they with the baby sloth? You'll have to read the book and find out!

I enjoyed Lea's book a lot. It had a good message about saving the rainforest. There is a specific scene where she fails to respect the rain forest, but her response shows great maturity. I thought this represented someone in 5th grade well. Lea's books are well written. I'm still upset AG doesn't illustrate their books anymore; I really liked using them as outfit inspirations and as a kid I lovedlooking at the illustrations. I thought Lea was kind of similar to Kanani-- but I doubt most of the target age group remembers Kanani. Crazy to think that was 6 years ago!

Have you read either of the Lea books? What did you think of her?


Sunday, February 7, 2016

My Latest Creation: Sun Dress from Pixie Faire

I've been busy sewing lately. I love sewing, unfortunately my machine doesn't love me, so it's been kind of frustrating. I did finish a doll dress that I wanted to show you. I made my dress from the Pixie Faire Drawstring Dress. The pattern was pretty easy, and I would totally recommend it.


I think it turned out pretty well! I was really inspired by Lea for this project. I felt like the purple went well with the colors of her collection. I can just imagine Lea walking down the beach, sand in her toes, wearing this dress. I got the fabric from Walmart at a really good price.


If you have ever sewn anything in your life, you probably would agree hemming is the worst part. I haven't touched a sewing machine in years, so I was pretty proud that this was straight!


This shot of Katelyn (#39) turned out pretty well.

Keep you eyes peeled on IG! I have a few more pictures I'll probably share there at some point or other. Have you sewn anything lately? I am working on quite a few projects. I recently became a Pixie Faire (Liberty Jane) seamstress, which means I am allowed to sell items made from their patterns in my Etsy shop. I am super excited to get some items up!

Saturday, February 6, 2016

Cooking: Molly's Toad-in-a-Hole

Hey all!

I hope you are having a lovely Saturday morning. I decided to make a special breakfast meal-- it is Saturday, after all! I was paging through some of my mom's cookbook's when I saw a recipe for a Toad-in-a-Hole! A Toad-in-a-Hole is basically toast with an egg in the middle. They are fast, fun, and easy to make.

Molly probably made Toad-in-a-Holes. Eggs were one of the few things that were not rationed, so Mrs. Gilford didn't feel as guilty when she used eggs!


One of the awesome things about this recipe is how few ingredients it needs and how easy it is to adjust the proportions! Listed below is enough to make six slices of bread. My slices of bread were super small, so I found that a serving was about 3 slices.

You will need:
  • 6 slices of bread
  • Something circular to cut the hole with (Find the right size for your bread-- there should be about an inch of bread between the crust and the hole. I used an Ikea juice glass to make an imprint and knife to cut it out.)
  • Butter (Make sure it's at a spreadable temperature! You can also used margarine.)
  • 6 eggs

Cut the hole out. Then, butter the bread and turn the stove on to high. Put your  bread, butter side down, on an ungreased pan. Crack an egg and drop it in the center. When it has solidified on the bottom (#5), flip it over. You want most of the white to be solid, with only a little bit being liquid. Then, flip it over and put it on your plate!


Finally, you are done! You can add a topping-- I really like a sprinkling of powdered sugar on mine! You could try syrup, I bet that would be good.

Just a note, always error on the side of burnt for these. You don't want liquid egg in the middle.

Are you going to try making a Toad-in-a-Hole? If so, be sure to shoot my an e-mail (americangirlcorner@gmail.com) and send me a picture!

Friday, February 5, 2016

My Favorite Things


If you have ever watched The Sound of Music, I'm sure you remember that catchy song Maria sings about how when she is sad she remembers her favorite things. One of my favorite things to do is browse for doll stuff when I am not blogging! I love seeing what other people create. I put together a few of my favorite things for you this week.


1. Oxford Square Hooded Coat: Houndstooth is one of my favorite prints. Don't you think Grace looks cute?
2. French Breton Striped Tee, Full Flare Mini Skirt, & Sandals: I love the Grace feel of this outfit. Stripes are super trendy and the skirt adds a preppy touch.
3. American Girl Lunch: I just found this store on Etsy today, and this has got to be my favorite piece. I love everything in this lunch set. That sandwich makes me hungry.
4. Rebecca's Bedroom Accessories: This is probably my favorite thing out of the Rebecca BeForever collection. I've had a hard time biting the price tag on that one, but I love the details of it. I'm getting a part time job soon so maybe I can justify it as an employment celebration gift to myself? ;)

What's on your AG wishlist? I'm about to go and pick up some supplies for crafts to make my dolls. I really hope my sewing machine starts working again... it's been very inconsistent lately so I might have to take it in for servicing. If you have an Etsy shop or know of any cool AG places, leave a comment so I can check it out!

Thursday, February 4, 2016

Samantha's Victorian Valentine's Cards


One of Samantha's favorite things to do was to make Valentines for her friends and family. Aunt Cornelia would help Samantha piece together her elaborate Valentines. Today, I am going to show you how to make your own Victorian-inspired Valentine card, just like Samantha would have.

Victorian Valentines were super detailed and elaborate. You can check out my Pinterest board here to see some ideas and my sources for this activity.

  • Think nature & Cupid. Victorian Valentines featured lots of deer, birds, dogs, flowers, young children, and Cupid.
  • Lot of layers! The Victorians loved layering. They liked a busy card with lots of decorations.
  • Gold and lace. Doilies were very popular as well as anything gold.
  • Good penmanship. Penmanship was considered a work of art, so most cards had the message beautifully written.
  • Punny sayings. Bee mine, forget me not, etc.
Let's get started! You can use almost any card making supplies, but here are a few ideas...
  • Ribbon
  • Print outs (I saved you a few on Pinterest, and you can find more through Google.)
  • Cardstock-- pink, white, red, etc.
  • Hole puncher
  • Scissors
  • Glue
  • Sharpie Markers-- gold, black, silver
  • Doilies
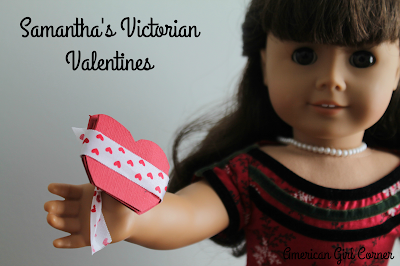
In the top picture of Samantha, her card actually expands! It's a bunch of hears linked together which have "I Love You" written on it. Victorians were really into cutouts. I did this by making a heat shake on cardstock. I had a flat bottom on the heart so it can stand up straight. Then I traced it, slightly overlapping the heart on the wide part and cut it out. I did nice lettering and added some ribbon for a special touch.


I incorporated some ribbon into this one by stringing it though holes make with a hole puncher. I added a cutout I found on Google and did some nice lettering. The best part? This cute ribbon was only $1 at the Dollar Tree.


I glued a layer of light pink tissue paper over red cardstock and added some cutouts and a doily. Victorian-era Valentines tended to be very full-- what we might call cluttered today.


I love this ribbon! I got it for $1 at Walmart. I really liked the vintage, lacy look of it.


I incorporated a cut-out like I used for Samantha's valentine in the very top picture, as well as a doily and some cut outs, not to mention that pretty lacy ribbon! The dog, cherub, and woman are very romantic, Valentine-y Victorian era.

I hope my creations help inspire you! Be sure to share with me any Valentines you make via e-mail-- I love seeing you guys make my ideas your own.


Wednesday, February 3, 2016

Photo Shoot: Samantha in the Snow

We have a lot of snow over here in the East (30 inches where I live!) and I decided to take advantage of the beautiful snow outside and snapped a few pictures of Samantha. She's wearing Cecile's Special Day Dress, which I love. Sam looks great in it, and it was only $12 on AG Cyber Monday a few years ago. I thought I would share a few of my favorites with you.


I love the woods in the background. I'm lucky; my family has a pretty big backyard-- we have a small "woods" section!


The print on the dress is my favorite part. I like the leafy-floral look.


Possibly my favorite picture from the shoot. I tossed some snow in the air to get some sprinkled on Sam. If you do this, just make sure you pat your doll's hair and face dry with a towel. :)


Did you get a lot of snow where you live? If you did, I hope you took a few pictures. Taking pictures in the snow is so much fun. I'll be posting some bonus pictures on my Instagram, so make sure you follow me. (@americangirlcorner)

Tuesday, February 2, 2016

Craft: Ribbon Headband


Today, I was feeling a little crafty. I made this cool, no-sew ribbon headband for Emily. It was so much fun I just had to make another, and I took some pictures to show you how to do it!


One thing I love about this craft is that all the supplies are easy to find. I got all of mine at Walmart. (My Walmart does have a sewing section; if yours does not, you can find these things at Michael's or online.)

You will need:
  • An iron & ironing board
  • Ruler
  • Scissors
  • Ribbon of your choice (If it is too wide, it will not sit properly on the doll's head. If it is narrower than the elastic, then this craft will not work.)
  • Narrow elastic
  • Iron-on hem
  • Scrap of fabric (will not be visible so the pattern does not matter)
  • Clear nail polish (optional)

First, measure and cut 9 inches of ribbon and 3 inches of elastic. Cut off 4 sections of the iron-on hem. (The iron-on hem rectangles should be narrower than your ribbon, but slightly wider than your elastic.) Cut your scrap into two parts-- the fabric should be wider than your elastic but narrower than your ribbon. On your ironing board, stack the ribbon, a piece of hem, the elastic, and another piece of hem. Add the fabric scrap on top and iron. Your brand of hem iron-on will probably have instructions on how long to rub the iron over it; mine was 7-10 seconds. Do the same thing with the other side. Be careful not to twist your ribbon! Let it dry for a few seconds and give it a gentle tug to make sure it is in place. If not, iron some more. Finally, flip so your fabric scraps are on the inside, and ta-da, you have it!


Emily is wearing a purple one I made her to match her Christmas dress. The purple ribbon was a little narrower, so it was harder to use since it was the same width as my elastic. I made the navy one that is shown in the instructions to match an outfit I am sewing. (Pics soon, I promise!)

What do you think of Emily's headband? If you make one, be sure to send me an e-mail(americangirlcorner@gmail.com), I love seeing what you make.

Monday, February 1, 2016

Welcome!

I feel like I should begin by defining this blog and what I intend for it to be about.

I've been a part of the AG community on and off since 2008-ish. (Wow, ten years is approaching fast!) I got my first AG doll back in 2001. I had a relatively well known AG blog. I want a fresh start in the blogging world so I am not going to reveal which one it was. ;) I want to run this blog mostly for fun. My old blog became more of a stressor than a stress reliever.

In my blog, I am planning to include lots of DIY. I am planning on posting on a daily basis, so keep checking back! I love hearing from my readers, so feel free to e-mail me (americangirlcorner@gmail.com) anytime.